Showing posts with label chocolate. Show all posts

12.23.2010

Baking a Bitter Cake

In the winter of 2008, I tore a recipe for a Whiskey-Soaked Dark Chocolate Bundt Cake out of the New York Times's dining section. I was so excited to make it. It contained quite literally all of the best things in the world: lots of butter, very dark chocolate, espresso, and whiskey--lots and lots of whiskey! It sounded delicious and exotic and very rich.

But I'd never made a liqueur-soaked cake before. I was a little afraid, so I tucked the scrap of newspaper away in my recipe box and forgot about it until a week ago when I was looking for something special to make for a family holiday party. I unfolded the crumpled newsprint and thought Aha! It fit the bill exactly: it would look beautiful, taste delicious, and feel distinctly holiday-ish--by which I mean sophisticated and special and a little expensive. Simply put, it would be perfect for a Sunday afternoon Christmas party with relatives.

So I set to work. At its core, it's a fairly straightforward butter cake recipe: it starts with creaming butter and sugar, then come the eggs and vanilla, and then you add the dry ingredients at the end. The only quirk is that the recipe ends similarly to Nigella Lawson's classic Dense Chocolate Loaf Cake recipe (which involves beating in alternating parts liquid and dry ingredients to the batter right before it goes in the oven).

The batter turned out beautifully: fluffy and rich and very, very alcoholic. I licked the spoon as I cleaned up and got a little bit tipsy. I mean, the cake itself has a whole cup of whiskey in it, even before it's baked and sprinkled with whiskey again!

Boozy, boozy batter.

The batter tasted a little, well, intense to me, but I figured that most of the whiskey flavor would bake out. So I went with it. I threw the batter in my Great Aunt Shirley's burnt orange bundt pan . . .


and baked it up. It came out perfect-looking, moist, and very very fragrant. My entire apartment smelled like rich chocolate with a touch of whiskey and espresso mixed in, as if Starbucks started serving cocktails alongside their mochas and lattes.


I plated it on my beautiful new milk glass cake platter (thanks, Mom!), splattered it with a few hearty tablespoons of whiskey, topped it with powdered sugar, and mourned the fact that I couldn't try it until the party. (Let's be honest: taste testing is the entire point of making cookies and cupcakes. Even if you make them to share, you get to try them right away--I need that instant gratification!)

The completed cake.

But I was terribly disappointed once dessert time arrived the next day. The cake was bitter, unbelievably so. The espresso powder, unsweetened chocolate, and whiskey all worked together to give it bite and nothing but. I couldn't taste the sugar or the butter or anything but char. The cake wasn't burnt at all, but it tasted like a chocolate-covered espresso bean that had spent some time in a fireplace!

I think that public opinion on the cake was split: half the party thought it was fantastic, and the other half smiled very politely and left a big chunk on their plates. As I watched my relatives nibbling away at the cake, I thought about how I'd do it better next time. Melissa Clark, the recipe author, had written that her grandmother had been the originator of the recipe. Clark had taken the recipe, drastically upped the alcohol content, and switched to unsweetened chocolate to add "sophistication" to the dessert while reducing its sweetness.

I decided right then and there that old fashioned was definitely the way to go with this one. Next time, I'm doing it Grandma Clark style: I'll be using semi-sweet chocolate, halving the espresso powder, and replacing half the whiskey with water. And, if it still turns out bitter, I think that a nice glaze (I'm thinking whiskey, cream, vanilla, and powdered sugar) will do a trick.

I may have been bitterly disappointed by this recipe, but I wasn't beaten. Hear this, Whiskey-Soaked Dark Chocolate Bundt Cake: we shall meet again!
The intrepid baker, ready for round two.

1.10.2010

Chocolate Cake with Homemade Chocolate Frosting

What can you say about chocolate cake that hasn't been said before?
 
"Yum!"?

"I'm in love!"?

"Best dessert ever!"?

"You call that measly thing a slice!?!"?


Cliches, the whole lot of them! There's nothing new to say about chocolate cake, yet, as a blogger, I must persevere. I must say something, anything! I have to make the chocolate cake new again, make it interesting enough to keep a reader's attention for a whole blog post.

But what?

Well, I suppose I can always tell the truth: Chocolate cake is easy. It's the frosting that's the hard part.


We'll get back to that in a minute. Let's start at the beginning: A Christmas present inspired me to bake this cake. The recipe comes from a book called Beyond Parsley, which was published in 1984 by the Junior League of Kansas City. Charlie's grandmother Carol (also known as Grammie O.!) gave me her copy for Christmas this year.

It's a beautiful cookbook, and I was excited to try some of the recipes in it. But I didn't know where to start. So I decided to do what I always do when I get a new cookbook: I flipped to the index and went straight to the entry for "chocolate."

This practice has always served me well before, and it did this time, too. What I found there was a recipe titled "Chocolate Cake with Fudge Icing."

The cake part of the recipe was pretty standard--nothing to write home about, I thought--but the finished cake was truly incredible. It's just the kind of chocolate cake that I always crave: moist, tender, mellow, and dense without being heavy.

The recipe starts with well-creamed butter and sugar . . .

. . . accompanied by all the usual suspects (vanilla, cocoa powder, eggs flour, etc.) and baking soda dissolved in a cup of boiling water.

The resulting batter was smooth and fluffy.

 The baked cakes turned out to be very pretty on their own and tall enough for torting.


What didn't go so well for me was the frosting. Beyond Parsley suggested a scrumptious-sounding fudge frosting that involved boiling butter and sugar and real chocolate. I have no doubt that this would have been the very best way to go with this cake; its mild chocolate flavor would have served as the perfect base for a rich, substantial, uber-chocolatey frosting.

But I was short on both candy thermometers and chocolate, and I knew that, with a shortage of ingredients and supplies, my fudge frosting might turn out to be a gloppy mess.

So I decided to make up my own chocolate frosting to use what little chocolate I had (which was a single bar of Ghirardelli dark chocolate from my Christmas stocking). I consulted some of my favorite cookbooks for chocolate frosting tips: one recipe called for whipped eggs, another for a double-boiler, another for rum and coffee, and another for granulated sugar.

There was no consensus to be found, no sure means of making a great chocolate frosting, so I decided to improvise with my limited list of ingredients and my limited frosting experience. I melted the chocolate bar and set it aside to cool. From there, I combined butter; splashes of vanilla, milk, and spiced rum; and a whole lot of powdered sugar in a bowl. After combining these well, I added more powdered sugar until I had enough frosting to cover both cakes. Then I stirred in my melted chocolate.


The resulting frosting was just what I expected: it was smooth, chocolatey, and very, very, very sweet. I licked the spoon and gagged a little. Oops!

To get the proper texture, I had added far too much powdered sugar. Perhaps if I had started with more chocolate or more butter, things would have turned out differently, but who knows? Perhaps without whipped eggs or cream of tartar or double boilers, great chocolate frosting cannot be created.

Still, when spread thinly and with restraint, my frosting was quite serviceable. The frosting's sweetness worked well with the understated darkness of the cake layers, especially if the slice was briefly microwaved so that the frosting turned all liquidy and limp.


So what can I say at the end of yet another battle with chocolate cake? "Yum," of course, and "Thank you Grammie O.!", and "Who has a candy thermometer that I can borrow?"

All these would make fine morals for this blog post, but what I really learned was that if your cake is good enough, your frosting needn't be more than an afterthought--and only a pretty, fluffy, mouth-achingly sweet afterthought, at that!

11.05.2009

How to Make Chocolate Kiss Cookies


Half-price Halloween candy, anyone?

Usually, I don't eat Hershey's Kisses. They taste sort of ashy and buggy and sour to me. But they were on sale the day after Halloween, and there's no better way of disposing of them than the Chocolate Kiss Cookie.


Yum.

They're perfectly lazy little cookies, too, so easy to make! All you do is combine your wet ingredients--

Oh, wait . . .

[rattling through the fridge--a shuffling of pickle jars, a brandishing of wilting lettuce heads]


Where's the milk?

[the fridge door swings ominously shut]

Well, shucks.

First, you beg your poor, long-suffering, sainted mother to go to the grocery store to pick up the milk that you thought you had when you preheated the oven.

While she's gone, you really get down to business. Cream the shortening (butter works too, but shortening keeps these nice and puffy) together with your white and brown sugars. Then beat the peanut butter in the mixture until the whole thing's a little fluffy. Then you add the vanilla and the egg and wait for the milk to arrive.

In the meantime, you mix your dry ingredients (the flour, baking soda, and salt) together in a separate bowl, and take a few minutes to unwrap precisely forty-two Hershey's Kisses.

Once your sweet, kind, cookie-hungry mother returns, you can beat the milk, egg, and vanilla into your dough. Add the dry ingredients to the wet mix in a couple of installations until everything's well combined. After that, use your fancy schmancy scooper to form dough balls. Roll each ball between your palms so that it's kinda round-ish.

Roll these in white sugar and throw 'em on the pan.


Bake for ten minutes or until the cookies start to turn golden brown on top.

Now here's the really important part: once you pull the pan out of the oven, never, NEVER wait to smush your room-temperature Kisses onto your oven-hot cookies. Not even to take a picture for your blog!

Well, okay, so maybe you can wait ten seconds for your camera to turn on. But if you wait too long before putting the Kisses on top of the cookies, the Kisses won't stick. You'll end up with wonky little peanut butter cookies with dents on top and a handful of naked Kisses rolling around in the bottom of your cookie jar, and that's a sad sight.

Let the cookies sit on the pan to cool for a few minutes, then move them somewhere to finish cooling. Be sure to play with the liquified Kisses by smushing them into funny shapes and twirling their hard tips and generally behaving like a second grader and getting chocolate everywhere.

(This is a very important step.)

Obviously, these cookies are simple, fun, and great to make with kids (or a twenty-five-year-old who enjoys playing with her food). And you get to discover that Hershey Kisses are much improved when melted and smeared all over a peanut-buttery, sugary, chewy little cookie.


---------------
Easy Chocolate Kiss Cookies
From the kitchen of Janet Hammer

Ingredients
1 3/4 cups flour
1 teaspoon baking soda
1/2 teaspoon salt
1/2 cup white sugar
1/2 cup brown sugar
1/2 cup shortening
1/2 cup creamy peanut butter (or crunchy, if you're kinky like that)
2 tablespoons milk
1 teaspoon vanilla
1 egg
extra white sugar for rolling
42 unwrapped Hershey's Kisses

Directions
Preheat your oven to 375 degrees.

Mix flour, baking soda, and salt in one bowl.

In a second bowl, cream white sugar, brown sugar, and shortening together by beating until the mixture is well-combined and fluffy. Cream peanut butter into the mixture. Add the egg, milk, and vanilla and beat until combined.

Add half of the dry ingredients to the wet mixture and beat until combined. Add the rest of the dry ingredients and combine.

Roll dough into balls 1" in diameter. Roll dough balls in white sugar and place on a cookie sheet. Bake for 10-12 minutes. Remove from the oven and press one unwrapped Hershey Kiss onto each cookie's center.

Let cool for as long as you can stand before eating.

9.22.2009

" . . . because, without beer . . .

things don't seem to go as well . . ."

The above quote is attributed to Brother Epp, a beer-brewing monk who lived in Kansas in the early 1900s. Once national prohibition hit, his monastery was forced to quit brewing their beloved ale, and Brother Epp famously wondered how they would keep toiling through the sweltering Kansas summers without beer to help them along.

Brother Epp's words are especially appropriate when it comes to Dave Lieberman's Chocolate Stout Cupcakes. I made these last night to disperse some pre-interview nervous energy (I think it went great, btw!).


Technically, things didn't go that great: my butter solidified upon being doused with some slightly-cooler-than-room-temperature stout, then I splattered the watery batter everywhere, then there was the wonky cup incident. Oy, what messes I made!


But these things happen. The most important thing is that I had bought an extra bottle of Boulevard Dry Stout to drink during the baking process, so then it felt like things were going better than they really were.


But at the end of the day, the cupcakes turned out good. They were, of course, chocolaty (they took 3/4 cup cocoa powder, for goodness sake!), but the stout gave the cakes a slight beery bitterness, making them taste like they were made with dark chocolate instead of cocoa powder. And the frosting--oh, goodness, the frosting!--turned out to be so, so good. It combines the mild tanginess of cream cheese with the puffy mildness of fresh whipped cream.


Even without all the deliciousness, aren't these a great idea? They're like delectable little Irish car bombs, only without the alcoholic bomb part: the cake is the Guiness and the frosting stands in for the Bailey's and the whiskey. And while the frosting may be (slightly) less hazardous to your health than hard liquor, I'm pretty sure that it's just as addicting.

---------------
Recipe by Dave Lieberman
Originally posted on FoodNetwork.com


Cake Ingredients
3/4 cup unsweetened cocoa, plus more for dusting finished cupcakes
2 cups sugar
2 cups all-purpose flour
1 teaspoon baking soda
Pinch fine salt
1 bottle stout beer*
1 stick butter, melted
1 tablespoon vanilla extract
3 large eggs
3/4 cup sour cream


Icing Ingredients
1 (8-ounce) package cream cheese, softened at room temperature
3/4 to 1 cup heavy cream**
1 (1-pound) box confectioners' sugar

Directions for Cake
Preheat oven to 350 degrees F.

In a large mixing bowl, whisk together the cocoa, sugar, flour, baking soda, and salt.

In another medium mixing bowl, combine the stout, melted butter, and vanilla.*** Beat in eggs, one at time. Mix in sour cream until thoroughly combined and smooth. Gradually mix the dry ingredients into the wet mixture.

Lightly grease 24 muffin tins. Divide the batter equally between muffin tins, filling each 3/4 full. Bake for about 12 minutes and then rotate the pans.**** Bake another 12 to 13 minutes until risen, nicely domed, and set in the middle but still soft and tender. Cool before turning out.

Directions for Icing
In a medium bowl with a hand mixer, beat the cream cheese on medium speed until light and fluffy. Gradually beat in the heavy cream.***** On low speed, slowly mix in the confectioners' sugar until incorporated and smooth. Cover with plastic wrap and refrigerate until ready to use. Icing can be made several hours ahead and kept covered and chilled.

Top each cupcake with a heap of frosting and dust with cocoa.******


---------------
*Be sure the beer is room temperature!
**Go light on the heavy cream. The recipe makes a ton of frosting, so you can skimp a little on the cream, leaving less liquid for the powdered sugar to soak up.
***Since my butter solidified (which is not uncommon, based on the FoodNetwork.com comments), it might be best to gently beat the butter, vanilla, and eggs together first before adding the stout.
****Mine only took about 15 minutes per pan, and rotating the pan did nothing for my cupcakes. Unless your oven is prone to creating lumpy, misshapen cakes, you can skip the rotating step. 
*****Be sure to beat the cream cheese for awhile to get it fluffy, and then to beat the heavy cream for awhile more after it's been added. You want this mix to be as fluffy as possible, since the powdered sugar actually makes the mixture more drizzly as you add it.
******I apologize for my excessive use of asterisks. They were uncalled for.

9.02.2009

A Chocolate Cake You Can Be Proud Of

Usually, I don't use the word "diet," and I most definitely don't use it in the same sentence with the word "dessert" or, even worse, "cake." I love cake, and I don't believe in mutilating a perfectly delicious food by making it low-cal or low-fat; it always turns out dry or gummy or plastic-y or flavorless or tasting vaguely like cardboard dust. I'd rather eat small amounts of indulgent recipes or to cut them out altogether in favor of fruit or yogurt, or whatever it is dieters eat.

But last week, a friend of mine who happens to be dieting for a special event was also having a birthday. I wanted to make her something that would be festive without being too over-the-top bad-for-you (which is usually my forte). So, of course, I hit Google, and after a short search, I discovered a low-fat cake recipe on EatingWell.com called the "Died-and-Went-to-Heaven Chocolate Cake."

I felt comfortable trying this recipe because it doesn't include anything too bizarre (no apple sauce or Diet Coke or prune juice, thank goodness!) and it's very similar to one of my favorite recipes ever: Nigella Lawson's Dense Chocolate Loaf Cake (I make it for Charlie's birthday every year). Just like the DCLC, EatingWell's cake is dark, chocolaty, moist, and (to use one of Nigella's favorite words) squidgy.

I also knew that this cake wouldn't be too dry (which is my number one complaint against most good-for-you recipes). Unlike most cakes, this one doesn't depend on vegetable oil for its moisture; instead, it stays succulent because of hearty doses of low-fat buttermilk and strong black coffee. As you can see, it makes a very runny, slightly frothy batter.


I doubled the recipe so I could have a couple of smaller cakes for my family to snack on. I made my friend's big cake in the bundt pan as the recipe suggests, but I used a couple of 9-inch round pans for the smaller cakes. I ended up liking the plain little round cakes better; they looked chic and demure, somehow, and it was very easy to tell when they were done baking. The bundt, however, was a little more challenging to judge because of its size; I could never get my toothpicks to come out completely clean, even after the cake shrunk away from the inside of the pan.


Besides the pan size, there's nothing I wanted to change about this recipe (which, by the way, was terrifically easy). I used vegetable oil instead of canola oil because it's what I had on hand, but I don't think it made a difference in the flavor. Be sure that the coffee you use is very strong; I couldn't taste the coffee flavor at all in my cake, but a stronger brew gives the chocolate a little more darkness and bite. Admittedly, the frosting is just a plain old sugar and milk recipe like the one I use to frost sugar cookies (only a little runnier), but its sweetness makes a wonderful contrast to the cake's mellow chocolate flavor.

I would highly recommend this recipe to someone who's watching his or her weight (it's only 220 calories per serving!), and it's great if you just want something chocolaty around the house that you can eat with a little less guilt. Also, this is a good dessert to trick an unwilling dieter with: if I hadn't told my friend and my family this was health food, I don't think they would have been able to tell!

---------------
EatingWell.com's Died-and-Went-to-Heaven Chocolate Cake

Ingredients


Cake
  • 1 3/4 cups all-purpose white flour
  • 1 cup white sugar
  • 3/4 cup unsweetened Dutch-process cocoa powder
  • 1 1/2 teaspoons baking soda
  • 1 1/2 teaspoons baking powder
  • 1 teaspoon salt
  • 1 1/4 cups buttermilk
  • 1 cup packed light brown sugar
  • 2 large eggs, lightly beaten
  • 1/4 cup canola oil
  • 2 teaspoon pure vanilla extract
  • 1 cup hot strong black coffee

Icing:

  • 1 cup confectioners' sugar
  • 1/2 teaspoon pure vanilla extract
  • 1-2 tablespoons buttermilk, or low-fat milk
  1. Preheat oven to 350°F. Lightly oil a 12-cup Bundt pan or coat it with nonstick cooking spray. Dust the pan with flour, invert and shake out the excess.
  2. In a large mixing bowl, whisk together flour, white sugar, cocoa powder, baking soda, baking powder and salt. Add buttermilk, brown sugar, eggs, oil and vanilla; beat with an electric mixer on medium speed for 2 minutes. Whisk in hot coffee until completely incorporated. (The batter will be quite thin.)
  3. Pour the batter into the prepared pan. Bake for 45 to 55 minutes, or until a cake tester inserted in the center comes out clean. Cool the cake in the pan on a rack for 10 minutes; remove from the pan and let cool completely.
  4. To make icing: In a small bowl, whisk together confectioners' sugar, vanilla and enough of the buttermilk or milk to make a thick but pourable icing. Set the cake on a serving plate and drizzle the icing over the top.

8.03.2009

Chocolate Chocolate Chip Cookies


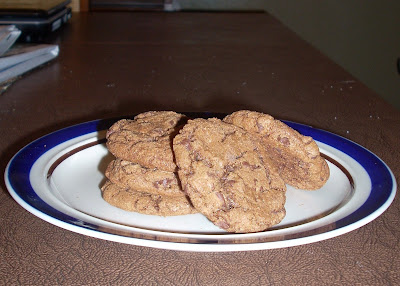
I've been looking for a way to jazz up the standard Toll House Chocolate Chip Cookie recipe for a few years now. I love chocolate chip cookies, of course, but they don't have much of a wow factor, and sometimes, they're just not chocolaty enough for me. Fortunately, I stumbled across Cathy Lowe's recipe for Chocolate Chocolate Chip Cookies on FoodNetwork.com. They were not at all difficult to make, but they were vastly superior to the chocolate chocolate chip cookies you can make following the old Toll House recipe; those cookies always had a corpsy grayish color and a plasticy texture.

Lowe's recipe, however, made for cookies with a lovely rich brown color; a crisp, macaroon-like shell; and a line of soft, brownie-like texture on the inside. To me, their natural cracks and fissures look a little like half-cooled lava covered with a broken crust of rock. Maybe I should call these Lava Crispies?

Anyway, their chocolate flavor is rich and very noticeable, even in bites without chocolate chips. My only criticism of the recipe is that the cookies dried out and turned hard very quickly, even when stored in an air-tight container. They're not the best cookies to keep around the house for a week, so it's better to make this recipe only when you plan on sharing!

I took the FoodNetwork.com reviewers' suggestion to bake the cookies at 350 degrees. At that temperature (and with my insulated cookie pans), the cookies took about 11 minutes per batch. I didn't grease my cookie sheets, but I did use parchment paper. I also used miniature chocolate chips so the chocolate chip texture was distributed over more cookie space. One last thing: I would suggest making the teaspoon of salt scant if you're sensitive to sodium (I was always thirsty after a couple of these!).

Enjoy!

-----------------------------------------------------------------------------

Chocolate Chocolate Chip Cookies

Recipe Courtesy of Cathy Lowe


Ingredients
  • 2 1/4 cups flour
  • 1 teaspoon salt
  • 1 teaspoon baking soda
  • 2 sticks butter, softened
  • 1 cup granulated sugar
  • 1 cup packed brown sugar
  • 2 large eggs, beaten
  • 1 tablespoon vanilla
  • 1/2 cup unsweetened cocoa
  • 2 cups chocolate chips, 2 Hershey's chocolate bars, chopped or M&M'S
  • 1 cup chopped walnuts (optional)
Directions

Preheat oven to 375 degrees. In a bowl stir together flour, salt, and baking soda. In another large bowl stir together butter, both sugars, eggs, vanilla and cocoa. Gradually stir flour mixture into butter mixture and mix until combined. Stir chocolate chips and walnuts, if using, and stir to distribute evenly.

For cookies: Drop dough by tablespoonfuls onto greased baking sheets and bake about 10 minutes. Cool on a baking rack.

For bars: Pat dough into a greased 9 inch square baking pan and bake 20 to 25 minutes. Cut into squares when cooled